Thursday, February 23, 2017
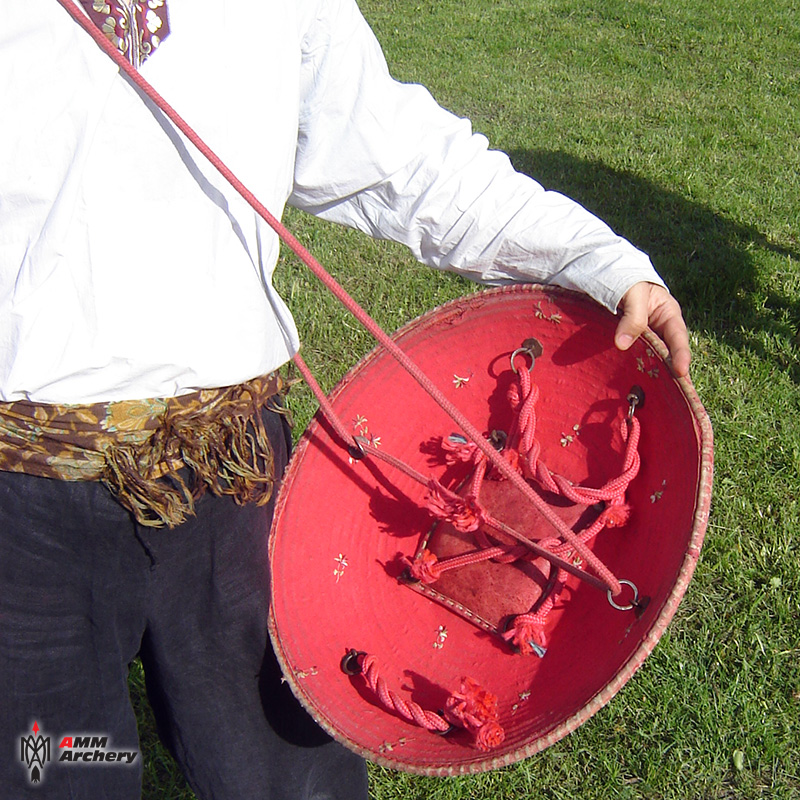
Use of kalkan shield, part 3a – shield on a folded in half loop, hung across one shoulder
Now it's time to present those techniques, that require the shield's loop to be folded in half and therefore shortened, to wear the kalkan higher on the body, on your back or upper arm. We begin with so-called "Donatello turtle" or "turtle across one shoulder" method, which is the fastest and easiest way to hang the shield on the back, using only one hand. The other hand can, at the same time, hold reins and/or saber, lance etc. Therefore it’s possible to take the kalkan on your back or remove it while turning your horse away or towards the enemy.
It is important to remember, that this shield was part of warrior more or less complete system of defenses, typically consisting of aketon and helmet of some kind, possibly chainmail, vambraces etc. etc. On our photos we present kalkan placed over a white shirt, but this is only to show clearly how the loop is worn. Description is for a right-handed person.
Thursday, September 29, 2016
Use of kalkan shield, part 2 – shield on a full length loop
 I will now describe various ways of using kalkan shield while it is hanging on a full length loop worn across your shoulder.
It is important to remember, that this shield was part of warrior more or less complete system of defenses, typically consisting of aketon and helmet of some kind, possibly chainmail, vambraces etc. etc. On our photos we present kalkan placed over a white shirt, but this is only to show clearly how the loop is worn. Description is for a right-handed person.
1. Kalkan hanging freely:
 you put fully extended loop across right shoulder, so the shield is hanging at your left hip. It is convenient to position the loop’s connection point (knot or buckle used to make a loop out of rope or thong) in the bottom, between rings – it will be used later as a kind of tag. You have to hang the shield with the wider of its two side grips facing upwards.
No matter what evolution we do with our shield, we never remove this loop from the shoulder, so it is not possible to lose the kalkan, even if we drop it by accident or release it to have both hands free – it is extremely important especially to the mounted warrior. The shield hanging on your left hip will not disturb you when using reins, shooting a bow or fencing, and only slightly interfere with drawing a saber from its sheath or a bow from bowcase, which will be partially covered.
Tuesday, August 9, 2016
Use of kalkan shield - or Teenage Mutant Ninja Turtles in action – part 1
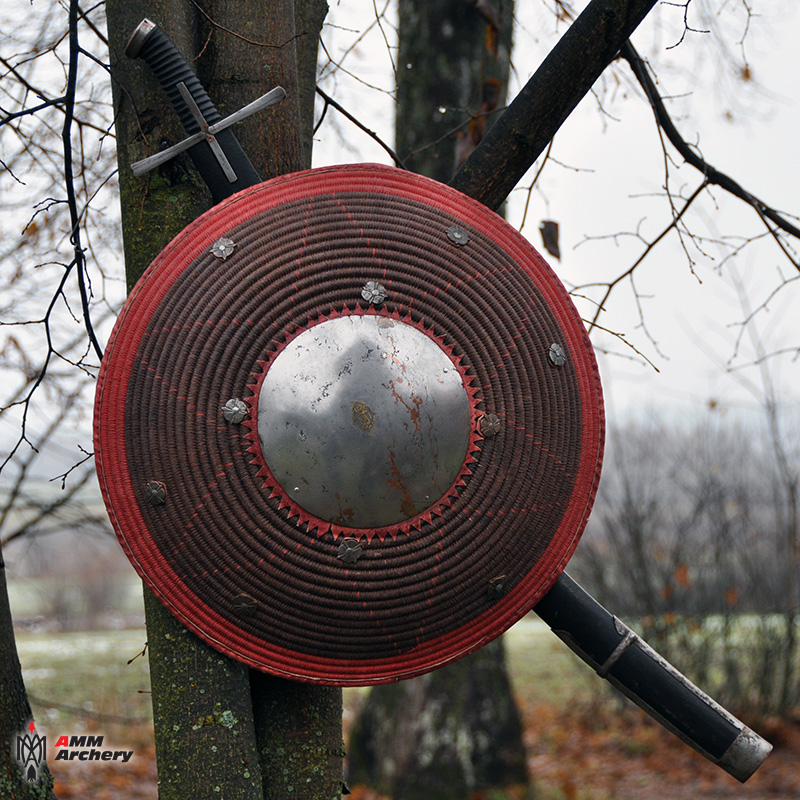
Kalkan is a medium size round shield, typical in the armament of light cavalry in many regions of Asia – and used also in Poland in XV-XVII c. This shield was commonly used both while mounted and on-foot, in conjunction with saber, spear and, of course, bow.
 Round shields are common in many cultures, but the striking features of kalkan are: light but very durable construction from spirally bound twigs “sewn” by thread and rather complex system of grips and loops, that can be used by a skilled warrior to protect himself from the front, sides, or back, as necessary, at the same time shooting his bow or fencing with spear or saber. This flexible technique was ideally suited for the light cavalry tactics of alternate attacks and retreats (and, to the modern spectators, immediately connotes with “ninja turtles” cartoon).
In this article I would like to present results of my experiments in reconstruction of methods to hold, carry and hang shield on the horse. As far as I know, this is a first successful attempt to recreate a way of using kalkan.
Thursday, March 3, 2016
Say hallo! to the reins extender - MUSTA'AN
 I would like to show you a little gadget, which most of modern horse archers never used, or even never saw. This is because most of modern horse archery competitions are held on straight, fenced track, so basically in a controlled environment, in which it is not necessary to touch the reins in between subsequent shots. Rider will lead his horse into the track, usually holding his bow in left hand and reins in right hand, start canter/gallop and then, just before starting line he will drop those reins loose onto horse’s neck, start shooting and only after the last target he will reach for reins, assuming that the slowing-down part of the track is long enough to find them, even if entangled in horse’s mane.
The reins are shortened by means of a knot or a mobile slider to prevent them from hanging too low and often, especially if the horse is galloping with its head low, their free end is tied to saddle front, or hooked over the pommel, if it is high enough. In this way we have our hands completely free to use bow and arrows and it seems to be the best way indeed to ride during this type of competitions.
Sunday, January 3, 2016
Preparing the bow for shooting part 6 BRACING THE BOW ON HORSEBACK
As a complement to previous parts, in which we explain bracing and checking the bow slowly and carefully, we can now show - for a change - one of the more “battlefield” ways of bracing a string, that is by mounted archer. In the old days there were a lot of similar “special” techniques, to be used in different circumstances, like bracing while running, or standing in deep water, without getting archery equipment wet. First of all I have to say, that most of those methods are more difficult and/or risky for your bow than “normal” techniques we described before. This knowledge is not really necessary if you take part in modern horseback archery competitions, as you can brace your bow beforehand, on the ground, or else ask some of the “ground crew” for help. Of course it was completely different under battlefield or hunting conditions, when an archer can spend whole day in the saddle and cannot ask his fellow warriors to stop and wait a moment while he dismounts and start preparing his bow before charge, or trying to replace broken string in the middle of a melee. Essential skill or not, I personally will not feel a complete horseback archer without the ability to perform such a basic task without dismounting - even if for the next ten years I'll do this only for training or demonstration purposes.
First method I would like to describe is suitable for most types of bows (on our photos we have Sanczenko and his Saluki Mameluk), more and less curved, with and without string bridges and regardless of limb tip shape. The only exception are extremely reflexed bows, with limb tips closing or even crossing each other when unstrung. Well, but those “crabs” are difficult to string even on-foot and with a helper...
We should notice, that old war bows were often less “aggressive” geometry than their competitive counterparts (like Turkish flight bows with half moon "hilal kuram" silhouette vs. war bows of "tekne kuram", boat-like shape, curved only at the ends) which, among other things, gave them more robustness and made them easier to maintain under field conditions.
One loop of the string we fix on appropriate limb tip and we position this end of our bow vertically downward, gripping opposite siyah in right hand, and free string loop in left hand, together with horse's reins (very similar position as when preparing to string the bow on the ground, by “across the leg” method).
First method I would like to describe is suitable for most types of bows (on our photos we have Sanczenko and his Saluki Mameluk), more and less curved, with and without string bridges and regardless of limb tip shape. The only exception are extremely reflexed bows, with limb tips closing or even crossing each other when unstrung. Well, but those “crabs” are difficult to string even on-foot and with a helper...
 |
| Bracing the bow on hurseback. |
One loop of the string we fix on appropriate limb tip and we position this end of our bow vertically downward, gripping opposite siyah in right hand, and free string loop in left hand, together with horse's reins (very similar position as when preparing to string the bow on the ground, by “across the leg” method).
Friday, January 1, 2016
COMMANDO BEAR, a comic-book about bear archery
Some time ago I wrote about a connection between "BearWay Archery" logo and the symbol of 22 Artillery Supply Company. I would like to add, that this true story about a bear serving in Polish Army during WWII also inspired authors of a cartoon in which Wojtek The Bear fight alongside legendary Jack Churchill, British Army officer with unconventional ideas about tactics and weapons of choice.
Meet COMMANDO BEAR!
This comic-book include bears, motorcycles, bows, swords and german nazis (and a lot of brutality towards the latter...).

You must see "The Historically Accurate Adventures of Jack & Voytek"!
Also, it'll be good to compare cartoon fiction with biographies of main characters: lieutenant-colonel "Mad Jack" Churchill and bear-corporal Wojtek.
Meet COMMANDO BEAR!
This comic-book include bears, motorcycles, bows, swords and german nazis (and a lot of brutality towards the latter...).
You must see "The Historically Accurate Adventures of Jack & Voytek"!
Also, it'll be good to compare cartoon fiction with biographies of main characters: lieutenant-colonel "Mad Jack" Churchill and bear-corporal Wojtek.
Preparing the bow for shooting part 5 CHECKING THE GEOMETRY - brace height and nockpoint height.
In the last chapter we considered tiller, in other words checking the limbs balance by measuring difference in distance between the string and top and bottom limb. Now it's time to look at brace height, that is distance between the string and the grip of our bow. Measuring this distance is an easy way to check correct string length.
 |
| Measuring brace height (BH) |
Subscribe to:
Posts (Atom)