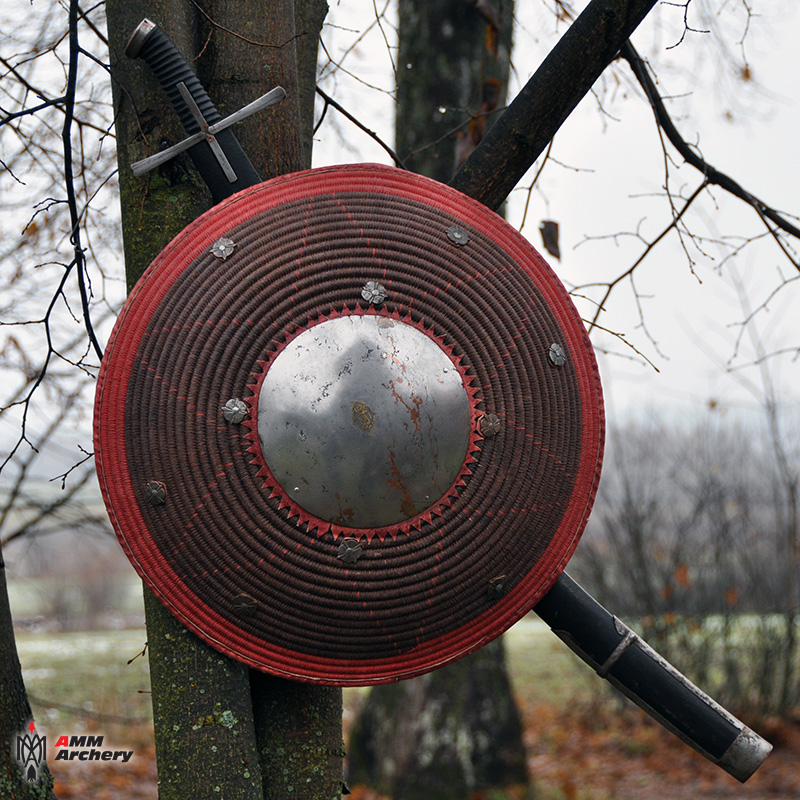
 Round shields are common in many cultures, but the striking features of kalkan are: light but very durable construction from spirally bound twigs “sewn” by thread and rather complex system of grips and loops, that can be used by a skilled warrior to protect himself from the front, sides, or back, as necessary, at the same time shooting his bow or fencing with spear or saber. This flexible technique was ideally suited for the light cavalry tactics of alternate attacks and retreats (and, to the modern spectators, immediately connotes with “ninja turtles” cartoon).
In this article I would like to present results of my experiments in reconstruction of methods to hold, carry and hang shield on the horse. As far as I know, this is a first successful attempt to recreate a way of using kalkan.
It is important to remember, that this quite small and light shield (about 50 cm diameter and weight a little over 2 kg) was part of warrior more or less complete system of defenses, typically consisting of aketon and helmet of some kind, possibly chainmail, vambraces etc. etc. On our photos we present kalkan placed over a white shirt, but this is only to show clearly how the loop is worn.
Ten rings on the inside of the shield form attachment points for ropes or thongs used to hold and/or hang the kalkan. Arrangement of those rings is very similar on all original shields, which is not surprising, as it is a result of their practical purpose (something like “three rings for the elven-kings...”).

Another four rings are positioned in two opposing pairs, close to the shield’s edge; one set is typically spread a little wider than the other. It is obvious, that they form bases for two holds, bigger one to go around the forearm and smaller fitting around wrist or held in the hand.
Two last rings, also positioned near edge, serve to attach long loop, used for hanging the shield on warrior’s back. In my opinion the secret of unhampered use of kalkan is in the proper construction of this loop. At the same time it is an element rarely found on the surviving originals – typically it’s missing or substituted with occasional rope for hanging shield in the museum case. All reenactors I ever met had their replica kalkans equipped with a thong, with both ends tied or fastened directly to those two rings and long enough to hang the shield across the back like a rifle. This is fine as long as you only ride around but to actually use the kalkan with such a short strap, you have to take it off completely which is not that easy nor fast when you do it with one hand only and try not to drop and lose the shield. In addition, the loop which is now hanging loose under the shield can tangle with horse’s reins or your saber grip etc. Adjusting its length by mean of buckle or something similar takes too much time.
In my reconstruction I used longer (about twice the size) thong or rope running freely through both rings and it’s both ends are then connected (tied or buckled) together to form one large, movable loop. When you use the shield this loop is always worn around your neck, so you cannot accidentally drop your kalkan no matter what you do, and long enough to operate it unhampered. The moment you want to put the shield on your back, with appropriate movement of one hand you fold this loop in half, pulling kalkan close to your body.
This trick allows us to perform very fast and without problems all maneuvers described or visible on pictures in original sources. In fact when I hit upon this idea for the first time, I learn myself to do only the basic move – that is to put the kalkan on my back with loop across one shoulder. Later, gradually, I tried other options, each time wondering, is it possible to do without changing my equipment. And each time, much to my surprise, it turned out that yes, it can be done even without regulating loop length. At the same time this arrangement of thong explain why it is typically missing on original, surviving shields – loop broken anywhere along its length will always detach from kalkan, while fragments of other grips, even very badly damaged, can often be seen as short slivers still connected to rings.
Since then I successfully tried my theory for several years, during numerous exercises, shows, reenactments and 40-50 km horseback treks. I cannot prove with 100% certainty that this is the historical way (or the only original way), but for me it just work too good to be a coincidence…
 How you can use this shield:
- Kalkan hanging freely, with a strap cross your shoulder (we never remove this part of strap).
As you can see, if you let the shield go, it will not drop to the ground, but hang somewhere around hip level. From this position, you can take it on the back (“make a turtle”), on your arm, on your forearm or take it by the center grip.
 - Kalkan kept by the center grip, on the extender hand.
In this position we can cover your front, either side and to some degree also your back (from the shield-arm side). Also, it is possible to raise the shield to cover your face or head. In certain situations you can support kalkan also with you other hand – like under attack from enemy fielding a heavy mace.
Very good position for fencing with a saber or spear, but you cannot use a bow; also while on horseback it is harder to use reins precisely.

- Kalkan on a forearm
Using this technique you can protect yourself from the front and one side, it is also possible to raise the shield to cover your face and most of your head. Range of movement is reduced in comparison to previous method and you cannot keep your opponent at distance, but there are some benefits: it’s now easier to manipulate reins with your kalkan-bearing hand, also it is possible to hold bow or string (so you can shoot on both sides).
 - Kalkan hung over the arm.
Shield worn that way will cover one side and partially front of your torso, leaving hands almost completely free, so you can use your reins or your bow very effectively. It is also possible to quickly move the kalkan around you and cover opposite side.
There is one main disadvantage of this technique: it’s not possible to quickly raise the kalkan to cover your face against suddenly incoming threat.
 - Kalkan on the back, hung across one shoulder („Turtle Donatello”).
 This type of shield can be quickly moved backwards, hung across one shoulder, to cover your back while running away from the enemy or simply to get it out of the way if not necessary at the moment. And when I say “quickly” I mean “really very quickly indeed” and using only one arm – while the opposite hand can hold reins and/or saber etc. Therefore it’s possible to take the kalkan on your back or remove it while turning your horse away or towards the enemy.
- Kalkan on the back, hung across both shoulders („Turtle Leonardo”).
Riding for several hours with a shield hanging as described above, across only one shoulder is a bit uncomfortable, as it has a tendency to slowly slide towards one side and keeping it centered requires a push with an elbow every five minutes or so. Not a big problem, but a bit irritating if you have to keep doing this for the next 50 km. To avoid this, you can hang your shield across both shoulders, with the two parts of the carrying strap crossed on your chest and kalkan sitting on your back as good as any backpack.
It takes a bit more time than previous method, and requires to use both hands, so it is less convenient when holding something. It is possible to do it with for e.g. with drawn saber, but you have to pass your weapon from one hand to the other for a moment.
- Kalkan hung at the saddle.
Cavalryman who didn’t like to ride with a shield on his back could hang it at the side of his horse, fastened to saddle cantle. Of course it takes quite a lot of time to unhook and use the kalkan and this method can only be utilized when travelling across relatively safe area or during parade – shield hanging just to the back of rider’s leg present full view of its decorative side to the crowd gathered along the way.
Proper method of fastening the shield (more details in the next parts) is important for the horse comfort, especially during trotting/cantering or when walking for a long time.
- Kalkan stored in the supply wagon.
It’s also worth mentioning how the shield was protected while stored or bounced about in the supply wagon. Polish Army Museum in Warsaw has in its collection (among several splendid examples of kalkans) an unique example of copper box or case used to protect parade-type kalkan. Shield was placed onto copper tray, convex side up, then covered with leather liner and closed with dome-shaped copper lid, attached with a single hinge.
http://www.muzeumwp.pl/emwpaedia/pokrywa-miedziana-na-kalkan.php
http://www.muzeumwp.pl/emwpaedia/pokrowiec-skorzany-na-kalkan.php
We can suspect that similar or maybe simpler, lighter and less expensive cases (leather or felt covers?) were used also for battle-type kalkans. At least we found a felt cover very usefull for packing our shields into a trunk of a car.
Kalkan you can see on the pictures was made by Norbert Kopczyński (basket) and Zbysio Juszkiewicz (metal elements), I’m responsible for making grips/straps and reconstruction of the various ways to use them.
Owner of the shield is Michal Sanczenko, who patiently posed for photos.
In the next parts we will discuss the details of each technique, especially from the archer’s / horseback archer’s point of view.
No comments:
Post a Comment